Yet more millinery class projects
Even though fall semester is now long done, I’ve got one last post of student projects to share.
Recall from the prior posts that the final project in the class is one that i call a “wild card,” in that it is left undefined—students can propose whatever project interests them (subject to my approval). It might be a hat that incorporates multiple media/methods covered in the semester, or it might involve a more elaborate process (such as making a block and then blocking a hat on it). Because i believe that graduate study in an arts discipline needs to allow for a broad range of students’ foci, this project is where they can take the knowledge gained over the prior semester and follow their own area of millinery interest. Or historical interest, or research interest, etc.
So, to recap, I’ve shared images from the students who chose to take the skills and techniques learned in our esparterie workshop and create a finished hat from that rare and unique medium, and i’ve shared the range of historically-inspired felt trim techniques explored by a student with a particular interest in the use of felt in early/mid-20th century women’s millinery fashions. These images i’m sharing today are three very different projects, all challenging in very different ways.
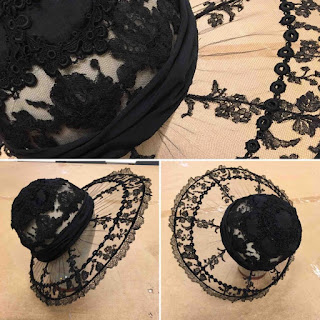 Black lace 1920s wire-frame hat by second year grad Robin Ankerich, perfect for a summer funeral.
 Blocked leather and lace pillbox/porkpie hybrid shape by second year grad Erin Torkelson. Ascot, anyone? Or perhaps a twilight arbor wedding.

Recall from the prior posts that the final project in the class is one that i call a “wild card,” in that it is left undefined—students can propose whatever project interests them (subject to my approval). It might be a hat that incorporates multiple media/methods covered in the semester, or it might involve a more elaborate process (such as making a block and then blocking a hat on it). Because i believe that graduate study in an arts discipline needs to allow for a broad range of students’ foci, this project is where they can take the knowledge gained over the prior semester and follow their own area of millinery interest. Or historical interest, or research interest, etc.
So, to recap, I’ve shared images from the students who chose to take the skills and techniques learned in our esparterie workshop and create a finished hat from that rare and unique medium, and i’ve shared the range of historically-inspired felt trim techniques explored by a student with a particular interest in the use of felt in early/mid-20th century women’s millinery fashions. These images i’m sharing today are three very different projects, all challenging in very different ways.


For her final project, continuing education student Athene Wright was interested in the concept of replicating an antique hat block using digital technologies. She decided to test the concept using a fairly simple yet unusual crown block with a conical tip.
Some years back, Candy McClernan (MFA ’13) had made a replica of this block using the traditional techniques of creating a mold using plaster bandages and a cast in two-part rigid foam. So, we knew from Candy’s project the time, cost, and materials required to replicate the original block using that process.
Athene wanted to investigate a state-of-the-art alternative: 3D scanning the original block with the help of the folks at our campus makerspace, correcting/adjusting the file, then 3D printing it down to the ropeline. She then used a bandsaw to cut out a two-piece wooden base which fitted into an indentation on the bottom of the 3D printed block. By this means she was able to tack into the wooden section when blocking the hat on the new form, instead of trying to drive pins into a 3D printed form (which we knew would splinter and crumble).
The image above shows the original block at left, the 3D printed block in the foreground, and the little wool hat Athene made on the new block to test drive it! Want to give it a whirl yourself? Athene has shared the file on Thingiverse, here: http://www.thingiverse.com/thing:2022236
The coming semester begins on Thursday and i’m teaching dyeing and surface design! The first third of the class is all chemistry and swatch book creation, so this marks the end of class project posts for a few weeks, but i’ve got some tutorials and project-related posts in the pipeline, soon.


Comments
Post a Comment