Casting a hat block in two-part foam
Most recently, I've blogged about copying hat blocks using digital technologies like 3D scanning, 3D printing, and CDC equipment like the ShopBot router to cut the blocks in foam and wood. However, you don't have to have access to the most up-to-date prototyping programs and equipment to create an exact copy of an antique hat block! You can do it the old-school way with plaster cloth and two-part foam.
After completing his MFA studies at UNC-Chapel Hill some years ago, alumnus Randy Handley entrusted me with the care of his hat block collection while he spent three years on a world tour with Cirque du Soleil. This was a mutually beneficial arrangement, since he agreed that my millinery students and I could block hats with them in his absence. Once he returned from tour and settled into a long-term job in Los Vegas, he retrieved his blocks for his own hat studio, but we had the opportunity to copy one of them first!
This became one of the Advanced Millinery projects for then-graduate student (now alumna) Candy McClernan. Candy had already taken my graduate-level millinery class as a continuing education student while working at the Carolina Ballet; once she entered the graduate program, together we devised a series of projects to give her a more challenging program of millinery study.
To copy Randy's vintage block, Candy started by using plaster bandages to make a mold. She wrapped the block in clingfilm before applying a triple layer of plaster strips. Once they dried, the negative mold of the block could be easily removed.


[An earlier version of this post/process appeared several years ago, when this blog was hosted on LiveJournal.]
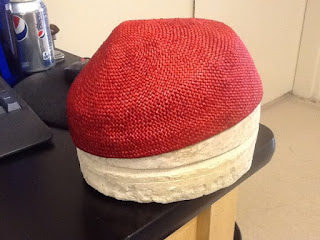
This cute "pencil point" crown block (shown with blocked straw hat blank)
is a copy of a vintage piece owned by one of our alumni, Randy Handley.
is a copy of a vintage piece owned by one of our alumni, Randy Handley.
After completing his MFA studies at UNC-Chapel Hill some years ago, alumnus Randy Handley entrusted me with the care of his hat block collection while he spent three years on a world tour with Cirque du Soleil. This was a mutually beneficial arrangement, since he agreed that my millinery students and I could block hats with them in his absence. Once he returned from tour and settled into a long-term job in Los Vegas, he retrieved his blocks for his own hat studio, but we had the opportunity to copy one of them first!
This became one of the Advanced Millinery projects for then-graduate student (now alumna) Candy McClernan. Candy had already taken my graduate-level millinery class as a continuing education student while working at the Carolina Ballet; once she entered the graduate program, together we devised a series of projects to give her a more challenging program of millinery study.
To copy Randy's vintage block, Candy started by using plaster bandages to make a mold. She wrapped the block in clingfilm before applying a triple layer of plaster strips. Once they dried, the negative mold of the block could be easily removed.

The plaster mold seated in a box to stabilize it.
It needed to cure in this position for a while after Candy poured the foam.
It needed to cure in this position for a while after Candy poured the foam.

Foam-It 5 containers and disposable cups, ready to go!
IMPORTANT: if you do this, make sure you use Ease-Release 2831 mold release on your mold!
This kind of foam sticks to almost everything, and other common release media do not work.
You can't use a silicone spray, or an oil spray, or anything BUT the Ease-Release stuff!
This kind of foam sticks to almost everything, and other common release media do not work.
You can't use a silicone spray, or an oil spray, or anything BUT the Ease-Release stuff!

Candy made a kind of "lollipop stick" with a wire anchor, to seat down in the foam while it cured. She planned to use this stick to help demold the finished piece.

Candy poured out the two-part foam from Smooth-On/Reynolds.
After this picture was taken she mixed the two parts and poured it into the mold.

That's not much foam...

...but it expands...

Look at that foam go!
The chemical reaction that makes the foam expand also generates a lot of heat.
The plaster mold can take it, but a plastic mold would melt.
(A student of mine made this error in casting wedge heels for a shoe project once.)
The chemical reaction that makes the foam expand also generates a lot of heat.
The plaster mold can take it, but a plastic mold would melt.
(A student of mine made this error in casting wedge heels for a shoe project once.)
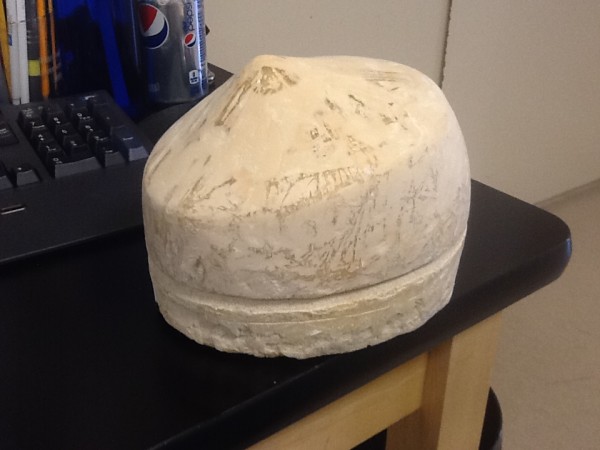
Check out the finished block.
Candy smoothed the surface even further with wood filler and sanded it, then Dremeled a rope line around the base. The resulting block is dense enough to block hats on while still being pinnable. It would work for a season or two of retail production, and is great for a theatrical application where it receives only occasional use.
[An earlier version of this post/process appeared several years ago, when this blog was hosted on LiveJournal.]


Comments
Post a Comment